Why
When I joined Prof. Yang's group, the LabVIEW software controlling
the experiment lacked control of the stepper motor which provides
coarse z axis control. This made it difficult to set up the fluid
cell and meant that leaving the system running unattended for over an
hour could place unnecessary strain on the z piezo (as it would need
to compensate for thermal drift on its own).
How
After a staring into the bowels of the MultiMode AFM and watching some of the more suspicious lines on an oscilloscope, I saw that lines 1, 2, 15, and 16 were the stepper motor drive lines and guessed that they were TTL compatible. A short while later (wink), the LabVIEW code was up and running. The LabVIEW computer (via a PCI-6052E card and BNC-2090 box) writes TTL stepper motor currents to the relevent lines on the Nanoscope↔MultiMode cable using our break-in box.
Computer <-> Breakout box <-> MultiMode
NanoScope <------^
Part list (outdated commercial parts linked to the current generation):
- LabVIEW 7.1 (in-house software)
- PCI-6052E
- BNC-2090
- Nanoscope IIIa (altered)
- Homemade break in box
- MultiMode II AFM
Breakout box
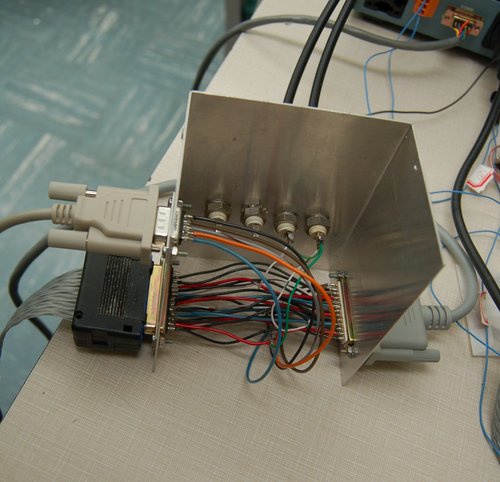
Build a DB-25 breakout box, such as the ugly hack job shown below. This gives us access to the stepper motor drive-lines.
Control the motor
First, you need something to write to your new motor control lines. We are using the digital I/O lines from this National Instruments PCI-6052E.
Next, you need to send the proper signals down the lines. Prof. Douglas Jones has an excellent stepping motor tutorial, which explains how to drive a unipolar stepping motor. For basic operation, you just need something like this pseudo-code:
step( up? ) {
  static int index=0; // saved between function calls, only initialized once
  int output[] = {sink 1a, sink 2a, sink 1b, sink 2b}; // the output array
  if (up? == TRUE) {
    index = (index + 1) mod 4;
  } else { // down
    index = (index - 1) mod 4;
  }
  write( output[index] );
}
For my MultiMode, the motor steps 'Up' when I equate:
| DB-25 | Role |
|---|---|
| 1 | 1a? |
| 2 | 1b? |
| 15 | 2a? |
| 16 | 2b? |
I've written a Python stepper module which handles the stepper logic for you.
Problems
The stepper motor, like any other mechanical linkage, can have problems with backlash.
Figuring it out
General stepper motor wiring
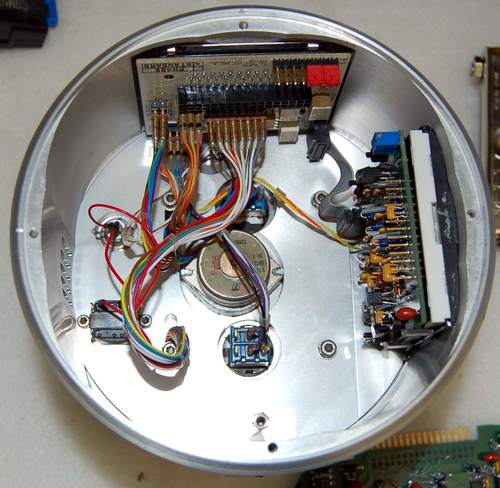
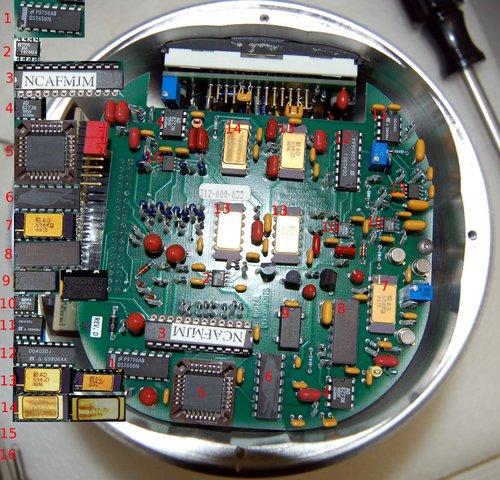
If you look back at the MultiMode interior and main board (above), you can see that there are wires coming from the stepper motor, going into the connector board, and (presumably) ending up at the main MultiMode board. Opening up your own MultiMode (until I get some better pictures up), you will see that the motor has 6 leads: green, brown, black, red, yellow, and orange. A few seconds with your ohm-meter, and you'll find the resistances between the leads are either 20 or 40 ohms. I've recorded the resistances in the following table:
| Brown | Green | Black | Yellow | Red | Orange | |
|---|---|---|---|---|---|---|
| Brown | 20 | 40 | Inf. | Inf. | Inf. | |
| Green | 20 | Inf. | Inf. | Inf. | ||
| Black | Inf. | Inf. | Inf. | |||
| Yellow | 20 | 40 | ||||
| Red | 20 |
Browsing through Prof. Jones' tutorial, we see that our motor is probably unipolar with a total winding resistance of 40 Ohms on each winding.
Looking closely at the stepper motor, you can see (upside down, near
the right hand screw) that it is labeled 5 V DC, and 5 V over a
20 Ohm half-winding gives a current of I = V/R = 0.25
Amps. Following the motor leads back up the the main board (using the
ohm-meter guess-and-check method :p), we find that they come from the
DS3658N (chip 1). This chip takes care of all the details of sinking
the large motor currents given a TTL driving pattern.
WARNING! I strongly suggest you don't do this on your own. The high voltage lines for driving the piezo are potentially dangerous.
The control for the DS3658N was too difficult for me to trace out on the board, so I put the main board back in the MultiMeter (leaving the base-plate off), connected the Multimeter to our NanoScope IIIa, and started clicking on the ‘raise’ and ‘lower’ tip buttons. At the same time, I watched the various DB-25 lines on the oscilloscope. DB-25 lines 1, 2, 15, and 16 oscillated, but only when the motor was turning, so I figured they must be direct TTL controls getting (somehow) to the DS3658N. I built a DB-25 breakout box to take control of those lines, and started writing software.
Line roles
Knowing the stepper control lines and how to control a unipolar motor, it was only a matter of matching the lines to the roles. I arrived at the matches that I pointed out in the How section through trial and error. It was fairly easy to get the motor moving macroscopically, and backlash testing convinced me that the microscopic motion is reproducible and smooth.
Stepsize
We measured the stepper stepsize by stepping the AFM tip closer to surface and sweeping the piezo in after each step. This produced the data shown below.
As the motor steps in, we record consecutive traces a, b, c, d, e, and
f. Because we can calibrate the piezo by imaging a calibration sample,
we can convert our piezo voltage into the distance shown on the x
axis. Measuring the x distance between to traces, we see that the
sample moves ~170 nm closer with each step.
Switch
There is a separate post with some details on the manual stepper switch.


