Some software I've found useful in my research, occasionally with personal forks, but no major time investments. When I've put in some more serious work, the appriopriate tag is code.
Node is a server-side JavaScript engine (i.e. it executes JavaScript without using a browser). This means that JavaScript developers can now develop tools in their native language, so it's not a surprise that the Bootstrap folks use Grunt for their build system. I'm new to the whole Node ecosystem, so here are my notes on how it works.
Start off by installing npm, the Node package manager. On Gentoo, that's:
# USE=npm emerge -av net-libs/nodejs
[Configure npm][npm-config] to make "global" installs in your personal space:
# npm config set prefix ~/.local/
Install the Grunt command line interface for building Bootstrap:
$ npm install -g grunt-cli
That installs the libraries under ~/.local/lib/node_modules and
drops symlinks to binaries in ~/.local/bin (which is already in my
PATH thanks to my dotfiles).
Clone Boostrap and install it's dependencies:
$ git clone git://github.com/twbs/bootstrap.git
$ cd bootstrap
$ npm install
This looks in the local [package.json][] to extract a list of dependencies, and installs each of them under node_modules. Node likes to isolate its packages, so every dependency for a given package is installed underneath that package. This leads to some crazy nesting:
$ find node_modules/ -name graceful-fs
node_modules/grunt/node_modules/glob/node_modules/graceful-fs
node_modules/grunt/node_modules/rimraf/node_modules/graceful-fs
node_modules/grunt-contrib-clean/node_modules/rimraf/node_modules/graceful-fs
node_modules/grunt-contrib-qunit/node_modules/grunt-lib-phantomjs/node_modules/phantomjs/node_modules/rimraf/node_modules/graceful-fs
node_modules/grunt-contrib-watch/node_modules/gaze/node_modules/globule/node_modules/glob/node_modules/graceful-fs
Sometimes the redundancy is due to different version requirements, but sometimes the redundancy is just redundant :p. Let's look with npm ls.
$ npm ls graceful-fs
bootstrap@3.0.0 /home/wking/src/bootstrap
├─┬ grunt@0.4.1
│ ├─┬ glob@3.1.21
│ │ └── graceful-fs@1.2.3
│ └─┬ rimraf@2.0.3
│   └── graceful-fs@1.1.14
├─┬ grunt-contrib-clean@0.5.0
│ └─┬ rimraf@2.2.2
│   └── graceful-fs@2.0.1
├─┬ grunt-contrib-qunit@0.2.2
│ └─┬ grunt-lib-phantomjs@0.3.1
│   └─┬ phantomjs@1.9.2-1
│     └─┬ rimraf@2.0.3
│       └── graceful-fs@1.1.14
└─┬ grunt-contrib-watch@0.5.3
  └─┬ gaze@0.4.1
    └─┬ globule@0.1.0
      └─┬ glob@3.1.21
        └── graceful-fs@1.2.3
Regardless of on-disk duplication, Node caches modules so a given module only loads once. If it really bothers you, you can avoid some duplicates by installing duplicated packages higher up in the local tree:
$ rm -rf node_modules
$ npm install graceful-fs@1.1.14
$ npm install
$ npm ls graceful-fs
bootstrap@3.0.0 /home/wking/src/bootstrap
├── graceful-fs@1.1.14  extraneous
├─┬ grunt@0.4.1
│ └─┬ glob@3.1.21
│   └── graceful-fs@1.2.3
├─┬ grunt-contrib-clean@0.5.0
│ └─┬ rimraf@2.2.2
│   └── graceful-fs@2.0.1
└─┬ grunt-contrib-watch@0.5.3
  └─┬ gaze@0.4.1
    └─┬ globule@0.1.0
      └─┬ glob@3.1.21
        └── graceful-fs@1.2.3
This is probably not worth the trouble.
Now that we have Grunt and the Bootstrap dependencies, we can build the distributed libraries:
$ ~/src/node_modules/.bin/grunt dist
Running "clean:dist" (clean) task
Cleaning dist...OK

Running "recess:bootstrap" (recess) task
File "dist/css/bootstrap.css" created.

Running "recess:min" (recess) task
File "dist/css/bootstrap.min.css" created.
Original: 121876 bytes.
Minified: 99741 bytes.

Running "recess:theme" (recess) task
File "dist/css/bootstrap-theme.css" created.

Running "recess:theme_min" (recess) task
File "dist/css/bootstrap-theme.min.css" created.
Original: 18956 bytes.
Minified: 17003 bytes.

Running "copy:fonts" (copy) task
Copied 4 files

Running "concat:bootstrap" (concat) task
File "dist/js/bootstrap.js" created.

Running "uglify:bootstrap" (uglify) task
File "dist/js/bootstrap.min.js" created.
Original: 58543 bytes.
Minified: 27811 bytes.

Done, without errors.
Wohoo!
Unfortunately, like all language-specific packing systems, npm has trouble installing packages that aren't written in its native language. This means you get things like:
$ ~/src/node_modules/.bin/grunt
…
Running "jekyll:docs" (jekyll) task
`jekyll build` was initiated.

Jekyll output:
Warning: Command failed: /bin/sh: jekyll: command not found
 Use --force to continue.

Aborted due to warnings.
Once everybody wises up and starts writing packages for Gentoo Prefix, we can stop worrying about installation and get back to work developing :p.
Lex Nederbragt posted a question about version control and provenance on the Software Carpentry discussion list. I responded with my Portage-based workflow, but C. Titus Brown pointed out a number of reasons why this approach isn't more widely used, which seem to boil down to “that sounds like more trouble than it's worth”. Because recording the state of a system is important for reproducible research, it is worth doing something to clean up the current seat-of-the-pants approach.
Figuring out what software you have intalled on your system is actually a (mostly) solved problem. There is a long history in the Linux ecosystem for package management systems that track installed packages and install new software (and any dependencies) automatically. Unfortunately, there is not a consensus package manager across distributions, with Debian-based distributions using apt, Fedora-based distributions using yum, …. If you are not the system administrator for your computer, you can either talk your sysadmin into installing the packages you need, or use one of a number of guest package managers (Gentoo Prefix, homebrew, …). The guest package managers also work if you're committed to an OS that doesn't have an existing native package manager.
Despite the existence of many high quality package managers, I know many people who continue to install significant amounts of software by hand. While this is sustainable for a handful of packages, I see no reason to struggle through manual installations (subsequent upgrades, dependencies, …) when existing tools can automate the procedure. A stopgap solution is to use language specific package managers (pip for Python, gem for Ruby, …). This works fairly well, but once you reach a certain level of complexity (e.g. integrating Fortran and C extensions with Python in SciPy), things get difficult. While language-specific packaging standards ease automation, they are not a substitute for a language-agnostic package manager.
Many distributions distribute pre-compiled, binary packages, which give fast, stable installs without the need to have a full build system on your local machine. When the package you need is in the official repository (or a third-party repository), this approach works quite well. There's no need to go through the time or effort of compiling Firefox, LaTeX, LibreOffice, or other software that I interact with as a general a user. However, my own packages (or actively developed libraries that use from my own software) are rarely available as pre-compiled binaries. If you find yourself in this situation, it is useful to use a package manager that makes it easy to write source-based packages (Gentoo's Portage, Exherbo's Paludis, Arch's packman, …).
With source-based packaging systems, packaging an existing Python package is usually a matter of listing a bit of metadata. With layman, integrating your local packages into your Portage tree is extremely simple. Does your package depend on some other package in another oddball language? Some wonky build tool? No problem! Just list the new dependency in your ebuild (it probably already exists). Source-based package managers also make it easy to stay up to date with ongoing development. Portage supports live ebuilds that build fresh checkouts from a project's version control repository (use Git!). There is no need to dig out your old installation notes or reread the projects installation instructions.
Getting back to the goals of reproducible research, I think that existing package managers are an excellent solution for tracking the software used to perform experiments or run simulations and analysis. The main stumbling block is the lack of market penetration ;). Building a lightweight package manager that can work easily at both the system-wide and per-user levels across a range of host OSes is hard work. With the current fractured packaging ecosystem, I doubt that rolling a new package manager from scratch would be an effective approach. Existing package managers have mostly satisfied their users, and the fundamental properties haven't changed much in over a decade. Writing a system appealing enough to drag these satisfied users over to your new system is probably not going to happen.
Portage (and Gentoo Prefix) get you most of the way there, with the help of well written specifications and documentation. However, compatibility and testing in the prefix configuration still need some polishing, as does robust binary packaging support. These issues are less interesting to most Portage developers, as they usually run Portage as the native package manager and avoid binary packages. If the broader scientific community is interested in sustainable software, I think effort channeled into polishing these use-cases would be time well spent.
For those less interested in adopting a full-fledged package manager,
you should at least make some effort to package your software. I
have used software that didn't even have a README with build
instructions, but compiling it was awful. If you're publishing your
software in the hopes that others will find it, use it, and cite you
in their subsequent paper, it behooves you to make the installation as
easy as possible. Until your community coalesces around a single
package management framework, picking a standard build system
(Autotools, Distutils, …) will at least make it easier for
folks to install your software by hand.
I've been trying to wrap my head around factor analysis as a theory for designing and understanding test and survey results. This has turned out to be another one of those fields where the going has been a bit rough. I think the key factors in making these older topics difficult are:
- “Everybody knows this, so we don't need to write up the details.”
- “Hey, I can do better than Bob if I just tweak this knob…”
- “I'll just publish this seminal paper behind a paywall…”
The resulting discussion ends up being overly complicated, and it's hard for newcomers to decide if people using similar terminology are in fact talking about the same thing.
Some of the better open sources for background has been Tucker and MacCallum's “Exploratory Factor Analysis” manuscript and Max Welling's notes. I'll use Welling's terminology for this discussion.
The basic idea of factor analsys is to model measurable attributes as generated by common factors and unique factors. With and , you get something like:
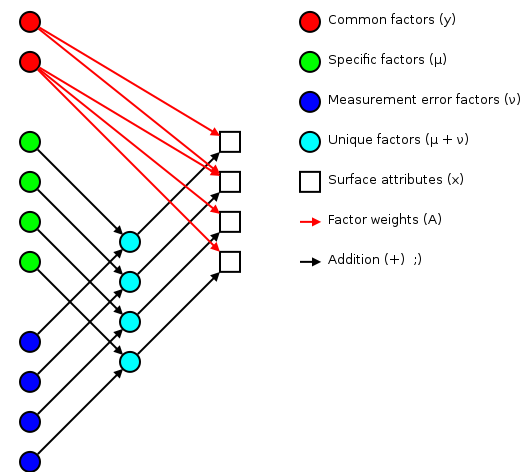 |
Corresponding to the equation (Welling's eq. 1):
The independent random variables are distributed according to a Gaussian with zero mean and unit variance (zero mean because constant offsets are handled by ; unit variance because scaling is handled by ). The independent random variables are distributed according to , with (Welling's eq. 2):
The matrix (linking common factors with measured attributes \mathbf{\mu}N\mathbf{x}nn^\text{th}\mathbf{A}\mathbf{\Sigma}\mathbf{x}\mathbf{y}\mathbf{\mu}\mathbf{A}\mathbf{\Sigma}\mathbf{A}\mathbf{\Sigma}n\mathbf{A}\rightarrow\mathbf{A}\mathbf{R}\mathbf{A}\mathbf{y}\mathbf{\Sigma}\mathbf{\nu}\mathbf{\Sigma}\mathbf{A}hi^2i^\text{th}x_i\mathbf{y}\mathbf{A} and the variations contained in the measured scores (why?):
>>> print_row(factor_variance + fa.sigma)
 0.89   0.56   0.57   1.51   0.89   1.21   1.23   0.69
>>> print_row(scores.var(axis=0, ddof=1))  # total variance for each question
 0.99   0.63   0.63   1.66   0.99   1.36   1.36   0.75
The proportion of total variation explained by the common factors is given by:
Varimax rotation
As mentioned earlier, factor analysis generated loadings that are unique up to an arbitrary rotation (as you'd expect for a -dimensional Gaussian ball of factors ). A number of of schemes have been proposed to simplify the initial loadings by rotating to reduce off-diagonal terms. One of the more popular approaches is Henry Kaiser's varimax rotation (unfortunately, I don't have access to either his thesis or the subsequent paper). I did find (via Wikipedia) Trevor Park's notes which have been very useful.
The idea is to iterate rotations to maximize the raw varimax criterion (Park's eq. 1):
Rather than computing a -dimensional rotation in one sweep, we'll iterate through 2-dimensional rotations (on successive column pairs) until convergence. For a particular column pair , the rotation matrix is the usual rotation matrix:
where the optimum rotation angle is (Park's eq. 3):
where .
Nomenclature
- The element from the row and
column of a matrix . For example here is a 2-by-3
matrix terms of components:
(13)
- The transpose of a matrix (or vector) .
- The inverse of a matrix .
- A matrix containing only the diagonal elements of , with the off-diagonal values set to zero.
- Expectation value for a function of a random variable . If the probability density of is , then . For example, .
- The mean of a random variable is given by .
- The covariance of a random variable is given by . In the factor analysis model discussed above, is restricted to a diagonal matrix.
- A Gaussian probability density for the random variables
with a mean and a covariance
.
(14)
- Probability of occurring given that occured. This is commonly used in Bayesian statistics.
- Probability of and occuring simultaneously (the joint density).
- The angle of in the complex plane. .
Note: if you have trouble viewing some of the more obscure Unicode used in this post, you might want to install the STIX fonts.
Available in a git repository.
Repository: catalyst-swc
Browsable repository: catalyst-swc
Author: W. Trevor King
Catalyst is a release-building tool for Gentoo. If you use Gentoo and want to roll your own live CD or bootable USB drive, this is the way to go. As I've been wrapping my head around catalyst, I've been pushing my notes upstream. This post builds on those notes to discuss the construction of a bootable ISO for Software Carpentry boot camps.
Getting a patched up catalyst
Catalyst has been around for a while, but the user base has been fairly small. If you try to do something that Gentoo's Release Engineering team doesn't do on a regular basis, built in catalyst support can be spotty. There's been a fair amount of patch submissions an gentoo-catalyst@ recently, but patch acceptance can be slow. For the SWC ISO, I applied versions of the following patches (or patch series) to 37540ff:
- chmod +x all sh scripts so they can run from the git checkout
- livecdfs-update.sh: Set XSESSION in /etc/env.d/90xsession
- Fix livecdfs-update.sh startx handling
Configuring catalyst
The easiest way to run catalyst from a Git checkout is to setup a local config file. I didn't have enough hard drive space on my local system (~16 GB) for this build, so I set things up in a temporary directory on an external hard drive:
$ cat catalyst.conf | grep -v '^#\|^$'
digests="md5 sha1 sha512 whirlpool"
contents="auto"
distdir="/usr/portage/distfiles"
envscript="/etc/catalyst/catalystrc"
hash_function="crc32"
options="autoresume kerncache pkgcache seedcache snapcache"
portdir="/usr/portage"
sharedir="/home/wking/src/catalyst"
snapshot_cache="/mnt/d/tmp/catalyst/snapshot_cache"
storedir="/mnt/d/tmp/catalyst"
I used the default values for everything except sharedir,
snapshot_cache, and storedir. Then I cloned the catalyst-swc
repository into /mnt/d/tmp/catalyst.
Portage snapshot and a seed stage
Take a snapshot of the current Portage tree:
# catalyst -c catalyst.conf --snapshot 20130208
Download a seed stage3 from a Gentoo mirror:
# wget -O /mnt/d/tmp/catalyst/builds/default/stage3-i686-20121213.tar.bz2 \
>   http://distfiles.gentoo.org/releases/x86/current-stage3/stage3-i686-20121213.tar.bz2
Building the live CD
# catalyst -c catalyst.conf -f /mnt/d/tmp/catalyst/spec/default-stage1-i686-2013.1.spec
# catalyst -c catalyst.conf -f /mnt/d/tmp/catalyst/spec/default-stage2-i686-2013.1.spec
# catalyst -c catalyst.conf -f /mnt/d/tmp/catalyst/spec/default-stage3-i686-2013.1.spec
# catalyst -c catalyst.conf -f /mnt/d/tmp/catalyst/spec/default-livecd-stage1-i686-2013.1.spec
# catalyst -c catalyst.conf -f /mnt/d/tmp/catalyst/spec/default-livecd-stage2-i686-2013.1.spec
isohybrid
To make the ISO bootable from a USB drive, I used isohybrid:
# cp swc-x86.iso swc-x86-isohybrid.iso
# isohybrid iso-x86-isohybrid.iso
You can install the resulting ISO on a USB drive with:
# dd if=iso-x86-isohybrid.iso of=/dev/sdX
replacing replacing X with the appropriate drive letter for your USB
drive.
With versions of catalyst after d1c2ba9, the isohybrid call is
built into catalysts ISO construction.
SymPy is a Python library for symbolic mathematics. To give you a feel for how it works, lets extrapolate the extremum location for given a quadratic model:
and three known values:
Rephrase as a matrix equation:
So the solutions for , , and are:
Now that we've found the model parameters, we need to find the coordinate of the extremum.
which is zero when
Here's the solution in SymPy:
>>> from sympy import Symbol, Matrix, factor, expand, pprint, preview
>>> a = Symbol('a')
>>> b = Symbol('b')
>>> c = Symbol('c')
>>> fa = Symbol('fa')
>>> fb = Symbol('fb')
>>> fc = Symbol('fc')
>>> M = Matrix([[a**2, a, 1], [b**2, b, 1], [c**2, c, 1]])
>>> F = Matrix([[fa],[fb],[fc]])
>>> ABC = M.inv() * F
>>> A = ABC[0,0]
>>> B = ABC[1,0]
>>> x = -B/(2*A)
>>> x = factor(expand(x))
>>> pprint(x)
 2       2       2       2       2       2
a *fb - a *fc - b *fa + b *fc + c *fa - c *fb
---------------------------------------------
 2*(a*fb - a*fc - b*fa + b*fc + c*fa - c*fb)
>>> preview(x, viewer='pqiv')
Where pqiv is the executable for pqiv, my preferred image
viewer. With a bit of additional factoring, that is:
In my gitweb post, I explain how to setup git daemon to serve
git:// requests under Nginx on Gentoo. This post talks
about a different situation, where you want to toss up a Git daemon
for collaboration on your LAN. This is useful when you're teaching
Git to a room full of LAN-sharing students, and you don't want to
bother setting up public repositories more permanently.
Serving a few repositories
Say you have a repository that you want to serve:
$ mkdir -p ~/src/my-project
$ cd ~/src/my-project
$ git init
$ …hack hack hack…
Fire up the daemon (probably in another terminal so you can keep hacking in your original terminal) with:
$ cd ~/src
$ git daemon --export-all --base-path=. --verbose ./my-project
Then you can clone with:
$ git clone git://192.168.1.2/my-project
replacing 192.168.1.2 with your public IP address (e.g. from ip
addr show scope global). Add additional repository paths to the git
daemon call to serve additional repositories.
Serving a single repository
If you don't want to bother listing my-project in your URLs, you can
base the daemon in the project itself (instead of in the parent
directory):
$ cd
$ git daemon --export-all --base-path=src/my-project --verbose
Then you can clone with:
$ git clone git://192.168.1.2/
This may be more convenient if you're only sharing a single repository.
Enabling pushes
If you want your students to be able to push to your repository during class, you can run:
$ git daemon --enable=receive-pack …
Only do this on a trusted LAN with a junk test repository, because it will allow anybody to push anything or remove references.
You can use pdftk to fill out PDF forms (thanks for the inspiration, Joe Rothweiler). The syntax is simple:
$ pdftk input.pdf fill_form data.fdf output output.pdf
where input.pdf is the input PDF containing the form, data.fdf is
an FDF or XFDF file containing your data, and output.pdf is
the name of the PDF you're creating. The tricky part is figuring out
what to put in data.fdf. There's a useful comparison of the Forms
Data Format (FDF) and it's XML version (XFDF) in the XFDF
specification. XFDF only covers a subset of FDF, so I
won't worry about it here. FDF is defined in section 12.7.7 of ISO
32000-1:2008, the PDF 1.7 specification, and it has been in
PDF specifications since version 1.2.
Forms Data Format (FDF)
FDF files are basically stripped down PDFs (§12.7.7.1). A simple FDF file will look something like:
%FDF-1.2
1 0 obj<</FDF<</Fields[
<</T(FIELD1_NAME)/V(FIELD1_VALUE)>>
<</T(FIELD2_NAME)/V(FIELD2_VALUE)>>
…
] >> >>
endobj
trailer
<</Root 1 0 R>>
%%EOF
Broken down into the lingo of ISO 32000, we have a header (§12.7.7.2.2):
%FDF-1.2
followed by a body with a single object (§12.7.7.2.3):
1 0 obj<</FDF<</Fields[
<</T(FIELD1_NAME)/V(FIELD1_VALUE)>>
<</T(FIELD2_NAME)/V(FIELD2_VALUE)>>
…
] >> >>
endobj
followed by a trailer (§12.7.7.2.4):
trailer
<</Root 1 0 R>>
%%EOF
Despite the claims in §12.7.7.2.1 that the trailer is optional, pdftk choked on files without it:
$ cat no-trailer.fdf
%FDF-1.2
1 0 obj<</FDF<</Fields[
<</T(Name)/V(Trevor)>>
<</T(Date)/V(2012-09-20)>>
] >> >>
endobj
$ pdftk input.pdf fill_form no-trailer.fdf output output.pdf
Error: Failed to open form data file:
   data.fdf
   No output created.
Trailers are easy to add, since all they reqire is a reference to the root of the FDF catalog dictionary. If you only have one dictionary, you can always use the simple trailer I gave above.
FDF Catalog
The meat of the FDF file is the catalog (§12.7.7.3). Lets take a closer look at the catalog structure:
1 0 obj<</FDF<</Fields[
…
] >> >>
This defines a new object (the FDF catalog) which contains one key
(the /FDF dictionary). The FDF dictionary contains one key
(/Fields) and its associated array of fields. Then we close the
/Fields array (]), close the FDF dictionary (>>) and close the
FDF catalog (>>).
There are a number of interesting entries that you can add to the FDF
dictionary (§12.7.7.3.1, table 243), some of which require a more
advanced FDF version. You can use the /Version key to the FDF
catalog (§12.7.7.3.1, table 242) to specify the of data in the
dictionary:
1 0 obj<</Version/1.3/FDF<</Fields[…
Now you can extend the dictionary using table 244. Lets set things up
to use UTF-8 for the field values (/V) or options (/Opt):
1 0 obj<</Version/1.3/FDF<</Encoding/utf_8/Fields[
<</T(FIELD1_NAME)/V(FIELD1_VALUE)>>
<</T(FIELD2_NAME)/V(FIELD2_VALUE)>>
…
] >> >>
endobj
pdftk understands raw text in the specified encoding ((…)), raw
UTF-16 strings starting with a BOM ((\xFE\xFF…)), or UTF-16BE
strings encoded as ASCII hex (<FEFF…>). You can use
pdf-merge.py and its
--unicode option to find the latter. Support for the /utf_8
encoding in pdftk is new. I mailed a
patch
to pdftk's Sid Steward and posted a patch request to
the underlying iText library. Until those get accepted, you're stuck
with the less convenient encodings.
Fonts
Say you fill in some Unicode values, but your PDF reader is having trouble rendering some funky glyphs. Maybe it doesn't have access to the right font? You can see which fonts are embedded in a given PDF using pdffonts.
$ pdffonts input.pdf
name                                 type              emb sub uni object ID
------------------------------------ ----------------- --- --- --- ---------
MMXQDQ+UniversalStd-NewswithCommPi   CID Type 0C       yes yes yes   1738  0
MMXQDQ+ZapfDingbatsStd               CID Type 0C       yes yes yes   1749  0
MMXQDQ+HelveticaNeueLTStd-Roman      Type 1C           yes yes no    1737  0
CPZITK+HelveticaNeueLTStd-BlkCn      Type 1C           yes yes no    1739  0
…
If you don't have the right font for your new data, you can add it using current versions of iText. However, pdftk uses an older version, so I'm not sure how to translate this idea for pdftk.
FDF templates and field names
You can use pdftk itself to create an FDF template, which it does with embedded UTF-16BE (you can see the FE FF BOMS at the start of each string value).
$ pdftk input.pdf generate_fdf output template.fdf
$ hexdump -C template.fdf  | head
00000000  25 46 44 46 2d 31 2e 32  0a 25 e2 e3 cf d3 0a 31  |%FDF-1.2.%.....1|
00000010  20 30 20 6f 62 6a 20 0a  3c 3c 0a 2f 46 44 46 20  | 0 obj .<<./FDF |
00000020  0a 3c 3c 0a 2f 46 69 65  6c 64 73 20 5b 0a 3c 3c  |.<<./Fields [.<<|
00000030  0a 2f 56 20 28 fe ff 29  0a 2f 54 20 28 fe ff 00  |./V (..)./T (...|
00000040  50 00 6f 00 73 00 74 00  65 00 72 00 4f 00 72 00  |P.o.s.t.e.r.O.r.|
…
You can also dump a more human friendly version of the PDF's fields (without any default data):
$ pdftk input.pdf dump_data_fields_utf8 output data.txt
$ cat data.txt
---
FieldType: Text
FieldName: Name
FieldNameAlt: Name:
FieldFlags: 0
FieldJustification: Left
---
FieldType: Text
FieldName: Date
FieldNameAlt: Date:
FieldFlags: 0
FieldJustification: Left
---
FieldType: Text
FieldName: Advisor
FieldNameAlt: Advisor:
FieldFlags: 0
FieldJustification: Left
---
…
If the fields are poorly named, you may have to fill the entire form with unique values and then see which values appeared where in the output PDF (for and example, see codehero's identify_pdf_fields.js).
Conclusions
This would be so much easier if people just used YAML or JSON instead of bothering with PDFs ;).
Portage is Gentoo's default package manager. This post isn't supposed to be a tutorial, the handbook does a pretty good job of that already. I'm just recording a few tricks so I don't forget them.
User patches
While playing around with LDAP, I was trying to troubleshoot the
SASL_NOCANON handling. “Gee,” I thought, “wouldn't it be nice to be
able to add debugging printfs to figure out what was happening?”
Unfortunately, I had trouble getting ldapwhoami working when I
compiled it by hand. “Grrr,” I though, “I just want to add a simple
patch and do whatever the ebuild already does.” This is actually
pretty easy to do, once you're looking in the right places.
Write your patch
I'm not going to cover that here.
Place your patch where epatch_user will find it
This would be under
/etc/portage/patches/<CATEGORY>/<PF|P|PN>/
If your ebuild already calls epatch_user, or it uses an eclass like
base that calls epatch_user internally, you're done. If not, read
on…
Forcing epatch_user
While you could always write an overlay with an improved ebuild, a quicker fix for this kind of hack is /etc/portage/bashrc. I used:
if [ "${EBUILD_PHASE}" == "prepare" ]; then
    echo ":: Calling epatch_user";
    pushd "${S}"
    epatch_user
    popd
fi
to insert my patches at the beginning of the prepare phase.
Cleaning up
It's safe to call epatch_user multiple times, so you can leave this
setup in place if you like. However, you might run into problems if
you touch autoconf files, so you may want to move your
bashrc somewhere else until you need it again!
I've been using abcde to rip our audio CD collection onto our fileserver for a few years now. Then I can play songs from across the collection using MPD without having to dig the original CDs out of the closet. I just picked up a large external hard drive and thought it might be time to take a look at ripping our DVD collection as well.
There is an excellent Quick-n-Dirty Guide that goes into more detail on all of this, but here's an executive summary.
Make sure your kernel understands the UDF file system:
$ grep CONFIG_UDF_FS /usr/src/linux/.config
If your kernel was compiled with CONFIG_IKCONFIG_PROC enabled, you
could use
$ zcat /proc/config.gz | grep CONFIG_UDF_FS
instead, to make sure you're checking the configuration of the
currently running kernel. If the udf driver was compiled as a
module, make sure it's loaded.
$ sudo modprobe udf
Mount your DVD somewhere:
$ sudo mount /dev/dvd /mnt/dvd
Now you're ready to rip. You've got two options: you can copy the VOBs over directly, or rip the DVD into an alternative container format such as Matroska.
Vobcopy
Mirror the disc with vobcopy (media-video/vobcopy on Gentoo):
$ vobcopy -m -t "Awesome_Movie" -v -i /mnt/dvd -o ~/movies/
Play with Mplayer (media-video/mplayer on Gentoo):
$ mplayer -nosub -fs -dvd-device ~/movies/Awesome_Movie dvd://1
where -nosub and -fs are optional.
Matroska
Remux the disc (without reencoding) with mkvmerge (from
MKVToolNix, media-video/mkvtoolnix on Gentoo):
$ mkvmerge -o ~/movies/Awesome_Movie.mkv /mnt/dvd/VIDEO_TS/VTS_01_1.VOB
(Processing the following files as well: "VTS_01_2.VOB", "VTS_01_3.VOB", "VTS_01_4.VOB", "VTS_01_5.VOB")
Then you can do all the usual tricks. Here's an example of extracting
a slice of the Matroska file as silent video in an AVI container with
mencoder (from Mplayer, media-video/mplayer on Gentoo):
$ mencoder -ss 00:29:20.3 -endpos 00:00:21.6 Awesome_Movie.mkv -nosound -of avi -ovc copy -o silent-clip.avi
Here's an example of extracting a slice of the Matroska file as audio in an AC3 container:
$ mencoder -ss 51.1 -endpos 160.9 Awesome_Movie.mkv -of rawaudio -ovc copy -oac copy -o audio-clip.ac3
You can also take a look through the Gentoo wiki and this Ubuntu thread for more ideas.
Screen is a ncurses-based terminal multiplexer. There are tons of useful things you can do with it, and innumerable blog posts describing them. I have two common use cases:
- On my local host when I don't start X Windows, I login to a
virtual terminal and run
screen. Then I can easily open several windows (e.g. for Emacs, Mutt, irssi, …) without having to log in on another virtual terminal. - On remote hosts when I'm doing anything serious, I start
screenimmediately aftering SSH-ing into the remote host. Then if my connection is dropped (or I need to disconnect while I take the train in to work), my remote work is waiting for me to pick up where I left off.
Treehouse X
Those are useful things, but they are well covered by others. A few
days ago I though of a cute trick, for increasing security on my local
host, which lead me to finally write up a screen post. I call it
“treehouse X”. Here's the problem:
You don't like waiting for X to start up when a virtual terminal is
sufficient for your task at hand, so you've set your box up without a
graphical login manager. However, sometimes you do need a graphical
interface (e.g. to use fancy characters via Xmodmap or the
Compose key), so you fire up X with startx, and get on with your
life. But wait! You have to leave the terminal to do something else
(e.g. teach a class, eat dinner, sleep?). Being a security-concious
bloke, you lock your screen with xlockmore (using your Fluxbox
hotkeys). You leave to complete your task. While you're gone
Mallory sneaks into your lab. You've locked your X server, so you
think you're safe, but Mallory jumps to the virtual terminal from
which you started X (using Ctrl-Alt-F1, or similar), and kills your
startx process with Ctrl-c. Now Mallory can do evil things in
your name, like adding export EDITOR=vim to your .bashrc.
So how do you protect yourself against this attack? Enter screen
and treehouse X. If you run startx from within a screen session,
you can jump back to the virtual terminal yourself, detach from the
sesion, and log out of the virtual terminal. This is equivalent to
climing into your treehouse (X) and pulling up your rope ladder
(startx) behind you, so that you are no longer vulnerable from the
ground (the virtual terminal). For kicks, you can reattach to the
screen session from an xterm, which leads to a fun chicken-and-egg
picture:
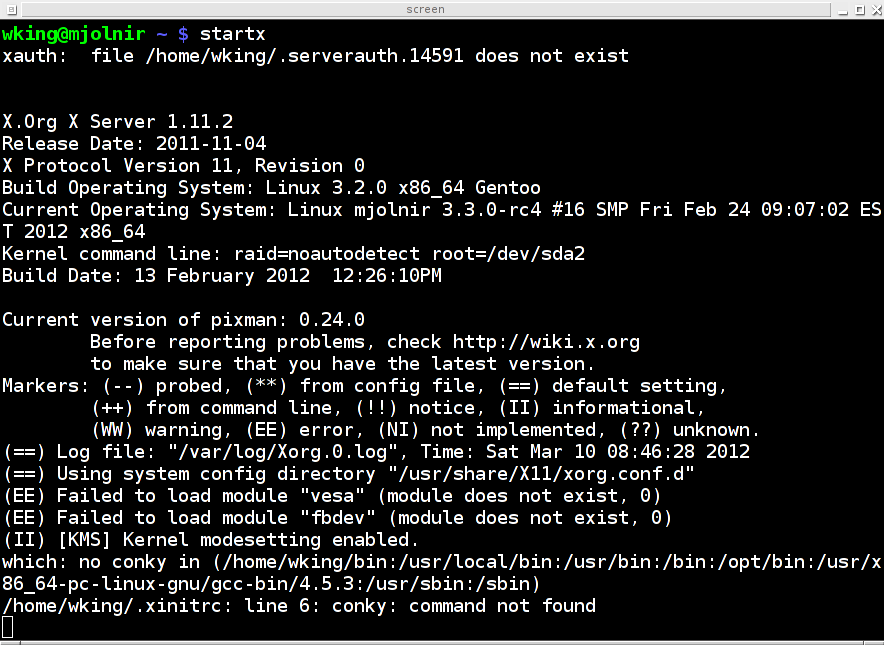 |
Of course the whole situation makes sense when you realize that it's really:
$ pstree 14542
screen───bash───startx───xinit─┬─X
                               └─fluxbox───xterm───bash───screen
where the first screen is the server and the second screen is the
client.